LinkBossPro-Black-Logo
LInkBossPro-OneLinkToBossThemAll-500-150

How to quickly customize template page design and settings, part 1

LinkBossPro customize template page Blog Cover
Quickly customize template page design and settings

Your LinkBossPro Biolink page is more than just a link in your bio or a link that you share on social media.

It is a connection for your audience to your personal mini webpage that is a one-stop-shop for them to interact with all your important content, links, products, and information.

Making it look GREAT is important not only for your growing your brand but also for their experience of your page. Customize template page design to make sure you maximise the template that you have selected. Follow these steps:

Step1: Add your Biolink profile picture to your LinkBossPro Biolink page by first clicking on the “Choose a profile image for your page” section. Then click on “upload” and select the picture that you want from your device. 

LinkBossPro Biolink Page Add Your Profile Picture section
LinkBossPro Biolink Page Add Your Profile Picture select upload

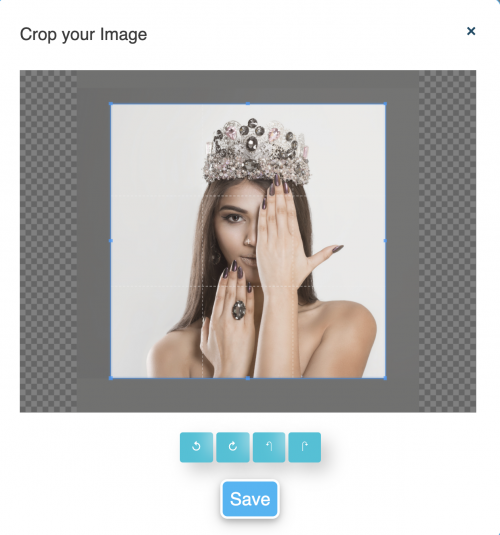
Once you have selected your preferred Biolink profile picture and clicked open, the image will appear in the image tool (see below image). Crop, re-size or amend as required and click “Save”. 

LinkBossPro add profile picture to your biolink page crop tool template

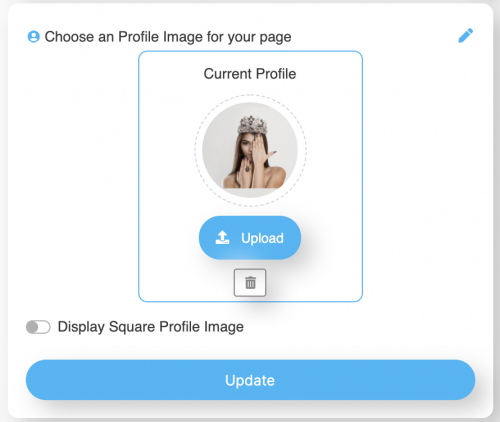
Your profile image will now appear on your settings page and look like this (click update to commit the changes). 

LinkBossPro customize template page settings profile picture uploaded

Step2: Customize template page Title and Description

Now you can enter your page title and description as indicated in the image below. 

You can also customize the text colour by selecting the text colour in the text colour box. 

LinkBossPro customize tenplate page settings title description add ed section

Click “Update” at the bottom of the section and check what your page looks like with its new background by scrolling down (mobile) or looking right (desktop) or checking out the Biolink URL on your browser.

LinkBossPro customize template page title description added

Step 3: Edit and customize template page background

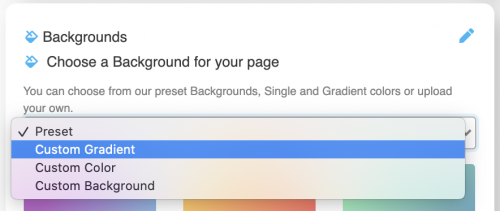
As we want to create the “Jane Smith” theme and the template is pre-populated, we will not make changes here but you may wish to tweak it. If you do, click on the “backgrounds” section. 

You can select a background that works best for the page that you are creating from the preset options or you can pick a custom colour. 

Alternatively, you can upload and add your own background image.

Or you can create your own custom gradient.

LinkBossPro biolink customise your page title description

Step 4: Add branding to your page

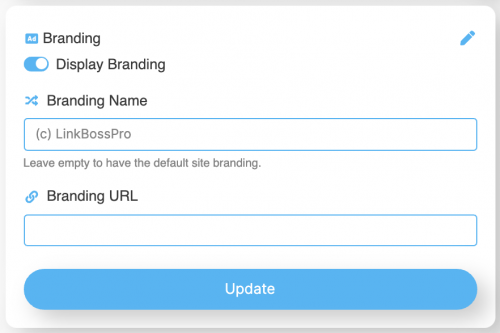
To add custom branding to your Biolink page, you can first select the Branding section under your LinkBossPro page settings and switch display branding to “ON”.

LinkBossPro Custom branding section image

Once you have done this, you can enter the text that will appear at the bottom of your page for your audience. 

You can link this text to a URL of your choice by adding the URL to the Branding URL section. 

If your audience clicks on the branding name, it will redirect them to the URL you enter here. 

You can select to not redirect your audience by leaving it blank.

(only available to Pro users)

LinkBossPro add branding to your Biolink page add link and name

Just like that you have added branding to your Biolink page. Click “Update” to commit your changes. 

You can check how your LinkBossPro Biolink page by scrolling down (mobile) or looking to the right (desktop) or opening your unique Biolink page link in your browser. 

LinkBossPro custom template page settings add title description branding preview

Step5: Add social media and key contact information to your Biolink page

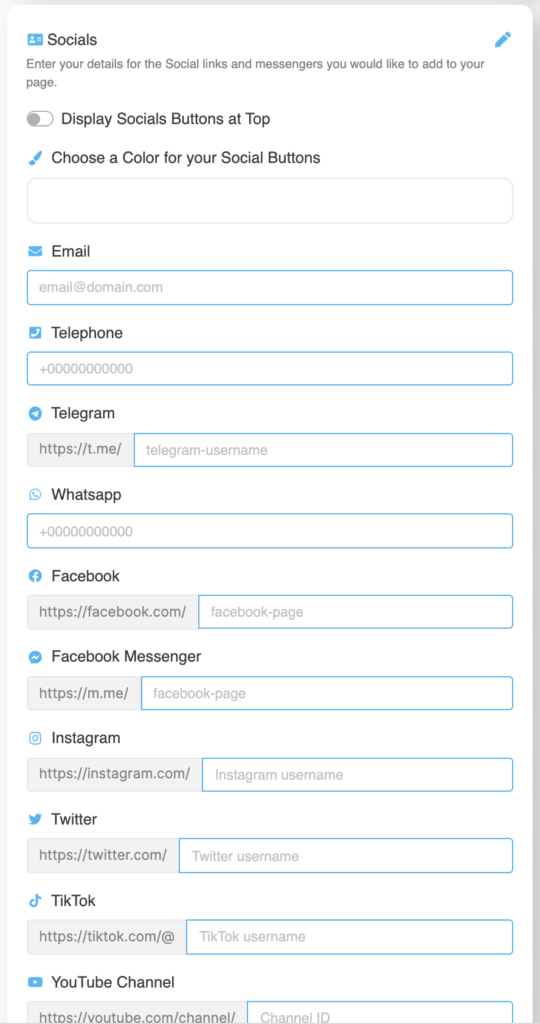
To add social media & key contact information to your LinkBossPro BioLink page simply go to the “socials” section in your settings to get started setting this up. 

LinkBossPro biolink page socials section image

Now add social media and key contact information in the appropriate field. When complete, click update to commit the changes. 

Note: you can feature the social media icons at the top or bottom of your page by toggling the “Display Social Buttons at Top” button on or off. 

LinkBossPro biolink page socials section input fields

Pro Tip: Click on each icon and check that it is all configured correctly.

A basic quality assurance check always ensures that you don’t have any broken links to your key social media and contact information. 

Congratulations you have been able to add social media and key contact information to your LinkBossPro biolink page. Next up, adding content & links to your custom template page

Still, need help?

If you have any additional questions about how to customize template page title, description and background, or any other questions, please contact the LinkBossPro customer support team in the chat (blue icon in the bottom right corner) or check out more articles here in our blog or check our Youtube channel. 

Alternatively, you can email our support team via support@linkboss.pro

Facebook
Twitter
LinkedIn
Pinterest

Leave a Reply

Your email address will not be published. Required fields are marked *

ABOUT AUTHOR
Alison Housten

Lorem ipsum dolor sit amet, consectetur adipiscing elit. Ut elit tellus, luctus nec ullam.

ADVERTISEMENT

Get fresh updates
about my life in your inbox

Our gallery